


I've ordered my email hosting - what next?
After ordering your email hosting you need to change your domain settings. Please see instructions here on Shopify DNS settings.
If you have problems doing this please open a ticket from within your account.
You will receive an email with login instructions for your email accounts. This can take upto 72 hours so please be patient.
Note that you will not be able to send and receive emails until your domain DNS has been changed.
What exactly is Shopped Email?
Shopped Email is an email hosting service specifically for Shopify merchants. Since Shopify doesn’t offer email hosting we decided to partner up with some official Shopify experts to enable you to manage email on your own custom domain.
So Shopped Email is not connected to Shopify?
No – we have no connection to Shopify. But we have developed this service with the assistance of official Shopify experts. It it an email hosting service built specifically for Shopify merchants.
So I can send and receive emails at my custom domain email address?
Yes! Exactly. So long as you own the domain then you’ll be able to send and receive mail from your domain.
Setting Up & Managing Your Account
How do I create my own Shopped Email Accounts?
Simply go here to order Shopify email hosting and follow the instructions. Once you’ve signed up it can take our engineers around 24 hours to set up your email accounts.
How can I pay for my email hosting?
We accept payments via Paypal and all major credit and debit cards. A recurring payment is set up when you create your accounts.
How do I cancel my Email Hosting account?
You can cancel your email hosting from within your Shopped email billing account here. Login and then select the service you wish to cancel and select “Request Cancellation”. Our engineer will deactivate your account and stop any further payments being taken from your payment method.
Note: we cannot simply close accounts when you email us. This would leave our service open to abuse as emails can be spoofed. You must login and cancel the account.
Why does it take up to 72 hours to access my mail?
There are a number of reasons why it takes around 72 hours for your email to become accessible after signing up. After you’ve paid and selected your accounts – our engineer has to change your domain’s MX record so that it points to our server. The DNS changes then need to propagate throughout the internet and this can take up to 72 hours. You may receive access to your email account sooner – during which time some mail mail bounce.
How About VAT?
We are currently not registered for VAT and so do not charge it or show it on our invoices. This may change in the future and we will update all customers if/when this happens.
Managing Your Emails
How do I check my emails?
There are a number of ways you can check your emails including webmail access, direct access from your Shopify store and imap/pop.
Please see our guide here on how to access mail.
How secure is the service?
Our email service is hosted on secure servers. Your email accounts are secured with passwords and SSL is used throughout our sites.
Can I add or delete email addresses?
Yes – to add email accounts you can simply purchase more in the same way you purchased the first ones. If you want to delete some but not all email accounts then there is a $29 fee for this. Please contact us.
Can I check my email on my mobile device?
Yes! Of course you can. Please see instructions here.
Can I check my emails via my Shopify store?
No – not currently. But we’re working on an app for this and will inform everyone when it becomes available.
How about email Forwarders?
You can have up to 10 email forwarders per domain. Each additional forwarder costs $1. Please contact support via your account with a list of the emails you want forwarding and the destination email.
Note: if your domain is registered with Shopify then we will copy any forwarders over to our system. At this point you will no longer be able to edit email forwarders via Shopify. Instead you will need to do this via our support channels.
Can I use different languages to check and manage email?
Absolutely. The Shopped Email interface can be changed via the settings to any of the following languages:
Albanian (Shqip), Arabic (Saudi Arabia), Arabic (العربية), Armenian (Հայերեն), Asturiana (Asturianu), Azerbaijani (Azərbaycanca), Basque (Euskara), Belarusian (беларуская мова), Bengali (বাংলা), Bosnian (Bosanski), Breton (Brezhoneg), Bulgarian (Български), Catalan (Català), Chinese (正體中文), Chinese (简体中文), Croatian (Hrvatski), Czech (Česky), Danish (Dansk), Dari (ﻯﺭﺩ), Dutch (Nederlands), English (Canada), English (GB), English (US), Esperanto Estonian (Eesti), Faroese (Føroyskt), Finnish (Suomi), Flemish (Vlaams), French (Français), Galician (Galego), Georgian (ქართული), German (Deutsch), German (Schweiz), Greek (Ελληνικά), Hebrew (עברית), Hindi (हिनदी), Hungarian (Magyar), Icelandic (Íslenska), Indonesian (Bahasa Indonesia), Interlingua Irish (Gaedhilge), Italian (Italiano), Japanese (日本語), Khmer (ភាសាខ្មែរ), Konkani (कोंकणी), Korean (한국어), Kurdish (Kurmancî), Latvian (Latviešu), Lithuanian (Lietuviškai), Luxembourgish (Lëtzebuergesch), Macedonian (Македонски), Malay (Bahasa Melayu), Malayalam (മലയാളം), Marathi (मराठी), Nepali (नेपाली), Norwegian (Bokmål), Norwegian (Nynorsk), Pashto Persian (فارسی), Polish (Polski), Portuguese (Brasil), Portuguese (Português), Romanian (Româneşte), Russian (Русский), Serbian (Српски), Sinhalese (සිංහල), Slovak (Slovenčina), Slovenian (Slovenščina), Spanish (Argentina), Spanish (Español), Spanish (Latin America), Swedish (Svenska), Talossan Tamil (தமிழ்), Thai (ไทย), Tigrinya (ትግርኛ), Turkish (Türkçe), Ukrainian (Українська), Urdu (اُردو), Vietnamese (Tiếng Việt), Welsh (Cymraeg), West Frisian (Frysk)
How do I set a signature?
You can change the email signature settings quite easily in Shopped Email.
Note that this signature will only be applied to mail sent from https://mail.shopped.email and not those on your own device/phone.
1. First select Settings from the menu.
2. Then select Identities – here you will find your signature settings.
3. Then click on the desired email address.
You will see a space to add a signature.
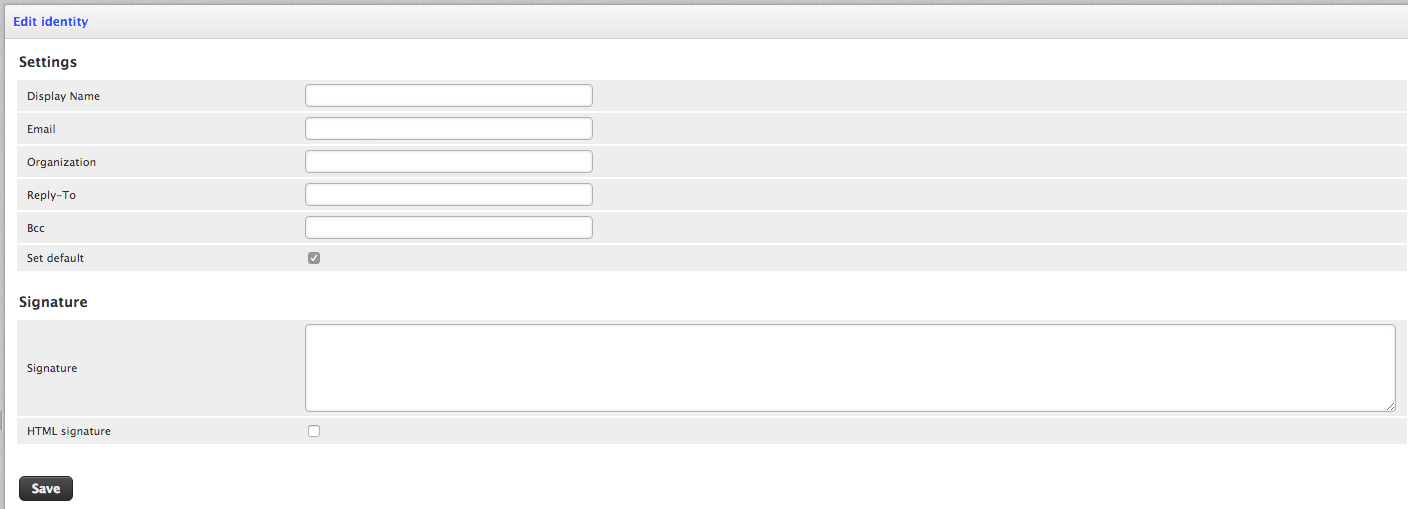
If you would like to add an image then this first needs to be uploaded to your files section of your Shopify store (it needs to be hosted online somewhere). Note: we strongly advise you do not add an image in the footer as it impacts on delivery and spam.
Normally you would add a html signature without an image (as images usually don’t display or can get flagged as spam).
After you have added your html signature then you need to click save.
4. Finally go to settings > composing messages
Find the Signature Options. Ensure that the signature is automatically added and click save.

5. Now go to compose an email message. The signature will appear on all new messages.
Email Migration
I'd like to migrate my email hosting to Shopped Email. Can you help?
Yes – we can give a quote for migrating mailboxes from another host. Please contact us for a quote.
